How to Tell If Your Pipes Are Frozen
by Jenna Mendez
14 min read

Frozen pipes pose a serious risk of water damage, structural issues, and increased repair costs. Early identification and proactive measures can mitigate these risks and prevent significant property damage. Frozen pipes can lead to burst pipes, which may cause flooding, mold growth, and damage to personal belongings and property. Recognizing the early warning signs of frozen pipes allows homeowners to take immediate action, minimizing potential damage.
But how can you tell if your pipes are frozen and/or prevent them from freezing? We’re here to help with a complete guide! Whether you’re a first-time homeowner or moving to a colder climate for the first time, we’ve got you covered with “must-know” advice.
Key Points of This Article:
- Frozen pipes can cause major problems including burst pipes, costly repairs, mold growth, and loss of water access.
- Pipes freeze when temperatures drop near 20°F, especially in unheated, poorly insulated, or drafty areas.
- Warning signs include no water flow, visible frost, unusual noises, foul smells, and physical pipe damage.
- Safe thawing methods involve gentle heat, while severe or long‑frozen pipes require professional help and preventive steps reduce future risk.
Why you should be concerned about frozen pipes
Frozen pipes aren’t something to take lightly. In colder climates like Illinois, Pennsylvania, Ohio, and Michigan, harsh winter temperatures can cause pipes in your home to expand and freeze. Here are some of the most concerning situations that come with the risk of hot water heater frozen pipes and frozen pipes in general:
Potential for Burst Pipes: When water inside a pipe freezes, it expands, creating pressure that can cause the pipe to crack or burst. This can lead to extensive water damage in the long run. This can lead to personal items being ruined or sections of your home being flooded.
Cost of Repairs: Repairing burst pipes involves not only fixing the plumbing but also addressing the resulting water damage. As a point of reference, the average hourly rate for plumbing services clocks in at $170. This doesn’t include expenses like emergency trip fees that you might need if you wait too long to repair your broken pipes.
Impact on Home Safety: Frozen pipes can lead to mold growth because of prolonged moisture exposure. This can cause health issues for residents in your home and weaken your home’s structure. Not to mention if mold is left untreated, it can downgrade your home’s value when it’s time to sell.
Inconvenience and Disruption: Frozen pipes can result in a complete loss of water access, impacting daily activities like cooking, cleaning, and personal hygiene. Plus, scheduling an emergency repair can disrupt your regular plans until the job is done.
Higher Water Bills: If burst pipes are left untreated and detected, when warmer weather rolls around, a broken pipe can lead to leaks and higher water usage. Higher water usage means higher water bills until your pipes are fixed.
Understanding the conditions that cause pipes to freeze
Knowing why pipes freeze is crucial information. It can help you save money and stress in the long run. Pipes typically begin to freeze when the outside temperature drops to around 20°F (-6°C) or lower. However, this can vary based on pipe insulation and exposure.
Prolonged exposure to temperatures below this threshold increases the likelihood of freezing. Similarly, pipes tend to freeze more often when water isn’t moved through them on a regular basis.
Pipes in areas with insufficient heating are more prone to freezing. Proper home heating ensures that all areas, especially unheated spaces, remain above-freezing temperatures. Pipes located in unheated or poorly insulated areas (e.g., attics, crawl spaces) are at higher risk.
Proper insulation can significantly reduce the risk of pipes freezing. Insulation helps maintain a consistent temperature around the pipes.
Wind chill can exacerbate the effects of cold temperatures, increasing the risk of freezing for exposed pipes. Pipes in colder regions where winters are severe require monitoring and regular wellness inspections.
Warning signs your pipes are frozen
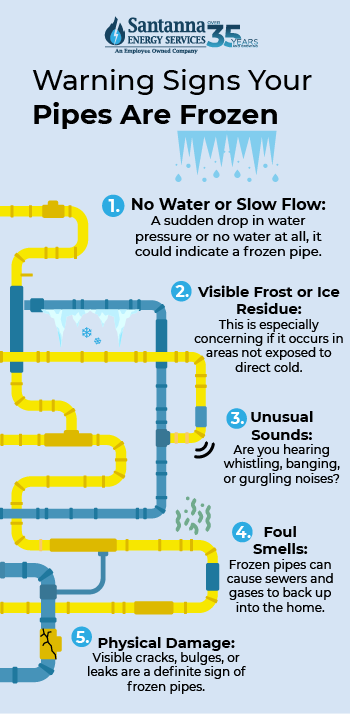
How can you tell if your pipes are frozen? Here are five things that tell you if you have frozen pipes:
- No Water or Slow Flow: If you turn on a faucet and experience a sudden drop in water pressure or no water at all, it could indicate a frozen pipe. If this happens to you, you can test for potential frozen pipes by turning on all faucets and fixtures to identify any areas with reduced flow or no water. If after a few minutes of running, you’re still experiencing low water pressure, there’s a good chance your pipes are frozen.
- Visible Frost or Ice Residue: Another sign of frozen pipes is frost or ice built up on the outside of pipes. This is especially concerning if it occurs in areas not exposed to direct cold. Visible ice indicates that a pipe is at risk of bursting once it thaws.
- Unusual Sounds: You can usually tell if your pipes are frozen by the sounds you hear. As you turn on your faucet or shower are you hearing whistling, banging, or gurgling noises? These sounds occur when water attempts to flow through a partially blocked or frozen pipe.
These noises can occur when there is an extra build-up of pressure. Be careful because added pressure increases the risk of an expansion and a burst pipe.
- Foul Smells: Strong, unpleasant smells from drains can indicate that a pipe is frozen, causing sewer gases and odors to back up into the home. These odors often accompany frozen pipes if they block or restrict normal flow.
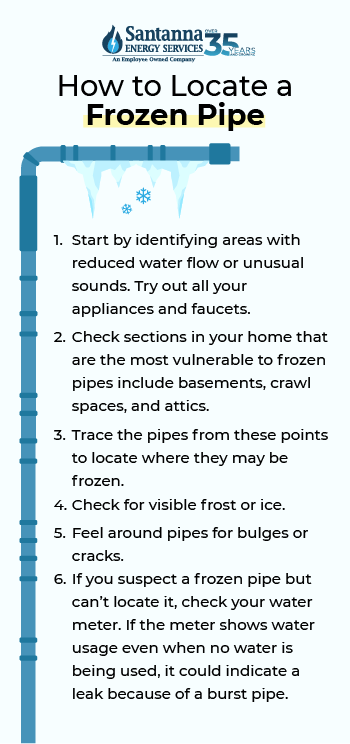
- Physical Damage: Visible cracks, bulges, or leaks are a definite sign of frozen pipes. These physical signs are indicative of pipes that have been compromised due to freezing and can lead to later damage.
How to locate a frozen pipe & where they commonly occur
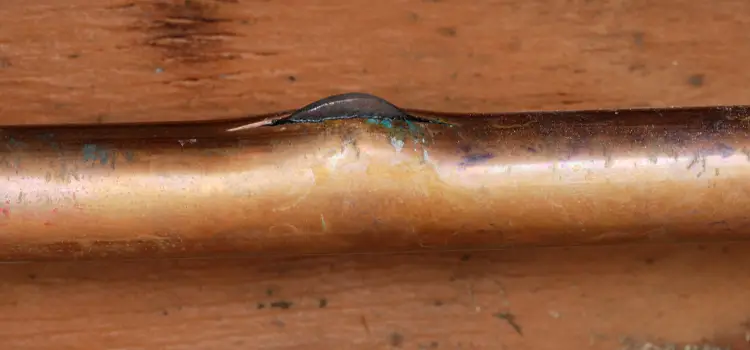
How to find a frozen pipe is important for both the safety of your family and your home! Without the proper steps, you could expose yourself to danger and costly consequences. Here’s how to find a frozen pipe:
- Identifying areas with reduced water flow or unusual sounds. Try out all your appliances and faucets in vulnerable areas and keep a list of any issues you find and where to find them later if bigger issues like broken pipes need to be addressed.
- Check sections in your home that are the most vulnerable to frozen pipes include basements, crawl spaces, and attics. Pipes exposed to outdoor elements or in drafty areas are at higher risk and should also be checked.
- Trace the pipes from these points to locate where they may be frozen.
- Inspect the pipes in these areas; if you see visible frost or ice, this is a sign of a frozen pipe.
- If you see no frost or ice, feel around those pipes for bulges or cracks. A bulge on a pipe can lead to a burst pipe and a crack means a pipe has already burst. Frozen sections often occur at pipe joints, bends, or elbows where water flow is restricted.
- If you suspect a frozen pipe but can’t locate it, check your water meter. If the meter shows water usage even when no water is being used, it could indicate a leak because of a burst pipe.
Sections in your home that are the most vulnerable to frozen pipes include basements, crawl spaces, and attics. Pipes exposed to outdoor elements or in drafty areas are at higher risk and should also be checked.
How to thaw frozen water pipes
If you’re wondering what to do if your pipes are frozen, you might be able to thaw them if they haven’t been frozen for long. Here is a list of safe and effective ways to thaw frozen water pipes yourself:
- Use a Hairdryer: Gently apply heat to the pipe starting from the faucet end and working backward. Use low heat settings to avoid rapid thawing. Don’t use this method for outside pipes as this can lead to electrical shock. Be sure that your hairdryer cord isn’t dragging in wet areas or puddles.
- Heating Pads: Wrap heating pads around the pipe and set them to a low heat setting for consistent warmth. Don’t use this method for outside pipes as this can lead to electrical shock.
- Hot Towels: Soak towels in hot water and wrap them around the frozen section of the pipe. Replace the towels every 10-15 minutes especially if you’re using this method for outdoor pipes. You don’t want the towel to stick!
- Space Heater: Place a space heater in the area where the frozen pipe is located, ensuring it’s positioned safely away from flammable materials or wet spots on floors.
As you thaw your frozen water pipes, keep in mind water will start flowing. Be sure to keep your faucet open so water can flow out. This can be achieved by twisting the knobs on your taps to the “on” setting. Be sure to apply heat until full water pressure is restored.
Keep in mind, these solutions can work for both hot water heater frozen pipes and all others too.
Things to avoid when thawing frozen water pipes
Do not use open flames, such as torches or propane heaters, as they pose a significant fire risk. In the same way, avoid applying excessive or concentrated heat quickly, which can damage pipes or cause them to burst.
When to call for professional help
Call a professional when your DIY solution just doesn’t pan out. If you’re experiencing persistent leaks or multiple burst pipes, professional help is recommended. If you’re having trouble locating a burst pipe, it’s best to leave it to the professional and not waste any more time searching; the longer you search, the more it’ll cost you.
When professional help comes to the rescue, you can expect a plumber to inspect, thaw, and repair damaged pipes. They may also provide advice on preventing future issues. Plumbers can offer solutions such as pipe insulation and rerouting problematic pipes to prevent future freezing.
How to handle pipes that have been frozen for two days
If you’re experiencing pipes frozen for 2 days or more, it’s time to call a professional. Pipes that are frozen for 2 days or more can lead to serious plumbing issues. In the meantime, keep inspecting your pipes for potential bursts or leaks. If you’ve located your frozen pipe, keep the affected faucet open to allow water to flow once the ice begins to melt.
Keep applying heat to the frozen area using a hairdryer, heating pad, or towels soaked in hot water. If the pipe remains frozen despite your efforts, it’s crucial to call a professional plumber. Delaying action could result in the pipe bursting, leading to extensive water damage and costly repairs.
Should you turn off your water if your pipes freeze?
As a cautionary measure, you should turn off your water if your pipes are frozen. This can help prevent additional water build up. If you notice significant leaks, puddles, or visible water damage, immediately turn off the water to prevent further flooding. Turning off the water helps minimize damage while you investigate.
If you hear banging or whistling noises or smell sewage, this can indicate pressure build up in your pipe which can lead to a burst. Turning off the water can prevent this from happening. For pipes exposed to extreme cold for extended periods, turning off the water prevents damage if you cannot address the issue immediately. Be sure to turn your water back on when you need it and only use faucets that aren’t connected to frozen pipes.
How to turn off your water
While the exact process of shutting off your water can vary, here’s a step-by-step guide on how to turn off your water:
- Locate the Main Water Shut-Off Valve: Your shut off valve can typically be found in basements, crawl spaces, or near the water meter. As a rule of thumb, your shut off valve is usually where the water line enters your home. If the indoor valve is inaccessible, locate the outdoor valve, often near the water meter or in a covered box by the street.
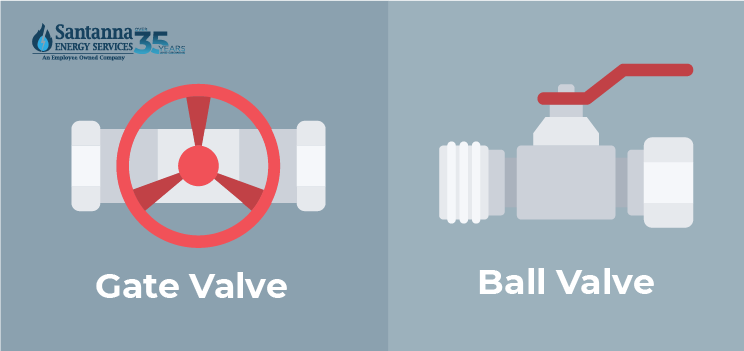
- Turn the Master Shut Off Valve: The master valve is usually painted red and shaped like a wheel (gate valve) or lever (ball valve). The gate valve can be operated by turning the wheel clockwise until the water is off, while the ball valve is operated by turning the handle a quarter-turn clockwise until the water is off.
- Check for Water Flow: Turn on a faucet to ensure water flow has stopped. If water continues to flow, the valve might not be fully closed or there might be another issue.
Preventive measures to avoid frozen pipes
If you’re looking for ways to prevent frozen pipes, we’ve got you covered:
- Pipe Insulation: Use pipe sleeves, heat tape, or foam insulation to protect vulnerable pipes. Adding extra insulation helps create a thicker barrier between your pipes and the cold air, reducing the chances of the water inside the pipes freezing.
- Hose Removal: Remove and store outdoor hoses before winter to prevent freezing. This eliminates a common source of trapped water that can freeze and expand.
- Pipe Thawing Cable Kit: Consider using pipe thawing cables that works to prevent your pipes from freezing in conditions from 38 – 0 degrees Fahrenheit.
- Keep your Garage Doors Closed: This not only prevents heat loss, but it protects your garage water supply lines if you have them.
- Seal Gaps and Cracks: Seal any gaps or cracks in walls, floors, and foundations that allow cold air to reach your pipes. This is especially important in areas where frozen pipes are the most common, like basements and attics.
- Run Your Faucets: Periodically through the winter season, turn on your faucets and let them run for about 15 minutes. This helps remove any ice buildup and keep your water flowing to prevent freezing.
These strategies work for hot water heater frozen pipes too!
Preventing frozen pipes in an empty house
If you know you’re going to be away from home during the winter season, here are a few tips to prevent frozen pipes in an empty house:
- Adjusting Thermostat: Set your thermostat to a minimum of 55°F (13°C) to maintain adequate heating.
- Opening Cabinet Doors: Allow warm air to circulate around pipes in cabinets and other enclosed spaces.
- Winterize Outdoor Faucets: Shut off the water supply to outdoor faucets, drain any remaining water, and cover the faucets with insulated covers.
- Drain and Winterize Appliances: Drain water from appliances like water heaters, dishwashers, and washing machines to prevent water from freezing and causing damage.
- Shut Off the Main Water Supply: Turn off the main water supply to the house and drain the plumbing system by opening all faucets and flushing toilets.
Tips for preparing for a Midwest winter
Congratulations! You’re ready to take on frozen pipes like a champ. Now that you know what to do if you’re living in the Midwest, here are a few of our favorite tips to take on the winter season:
- Create a winterization checklist by Including things like pipe insulation, sealing drafts, and ensuring proper heating to safeguard against extreme cold.
- Schedule a professional inspection and tune-up for your furnace to ensure it’s running efficiently and safely throughout the winter.
- If available, install storm windows to add an extra layer of insulation and protection.
- Check your vehicle’s antifreeze levels, battery, tires, and wiper blades.
- Assess your gas needs. If you anticipate higher gas usage to stay warm and comfortable this season, it may be wise to reassess your energy plan. Consider switching to a plan that offers greater predictability in the supply portion of your bill, ensuring more consistent and manageable bills.
For more tips and tricks for handling the winter season, visit our blog for more!
Preventing and addressing frozen pipes is crucial for protecting your home from significant water damage and costly repairs. By understanding the warning signs, knowing how to locate and thaw frozen pipes, and implementing preventive measures, you can safeguard your property against the harsh effects of winter!
There's peace of mind in knowing you'll pay the same monthly supply cost amount for your electricity or natural gas supply without any uncertainty — no matter what. Santanna's Unlimited Energy option protects your bills from fluctuating supply charges no matter the changes in seasons. For over 35 years, Santanna has served customers in Illinois, Indiana, Pennsylvania, Michigan, and Ohio. Our mission is to provide innovative and cost-effective energy solutions that will help our customers achieve their energy goals.
Jenna Mendez is a Midwest native with lifelong roots in Illinois and time spent in Ohio during college, giving her a deep understanding of the Midwest region’s people, climate, and energy needs. She brings firsthand experience and local insight to topics that matter to Midwest homeowners, especially energy efficiency, sustainability, and home living. Jenna specializes in writing about eco-friendly living, all things Midwest, renewable energy, and practical ways to reduce energy costs. Jenna brings a trusted, and local hometown voice to every article she writes, helping readers live well, and sustainably, right where they are.


