How to Winterize an Above Ground Pool

by Tyler Castle
18.7 min read

When temperatures start to drop, it’s time to think about more than just putting away your patio furniture—your above ground pool needs care too. Winterizing isn’t just a seasonal chore; it’s an essential step that protects your pool from damage caused by freezing temperatures, debris buildup, and algae growth.
Whether you’re a first-time pool owner or have years of experience, proper winterization ensures your pool equipment lasts longer, your water stays cleaner, and your spring reopening is smooth and stress-free. Let’s dive into the reasons why and the process of how to winterize your above ground pool:
Key Points of This Article:
- Winterizing an above‑ground pool prevents freezing damage, protects equipment, reduces algae growth, and keeps debris out during the off‑season.
- The ideal time to winterize is when water temperatures consistently fall below 65°F, which helps avoid algae growth and prepares the pool for colder weather.
- Essential tools include winter chemicals, a shop vac, a submersible pump, air pillows, and plumbing plugs to properly clean, treat, and protect the pool.
- The winterization process involves cleaning and balancing the water, lowering the water level, draining and storing equipment, sealing plumbing lines, and securely covering the pool for winter.
Why You Should Winterize an Above-Ground Pool
Winterizing your above-ground pool might feel like a lot of work now, but it’s one of the best things you can do to protect it during the off-season. If you’re thinking about skipping the winterization process, think again. Here are some of the benefits of doing so:
- It protects against freezing damage. When water freezes, it expands, and that expansion can crack your pool’s liner, walls, and even the plumbing if water is stuck in the system. Winterizing means draining things properly and ensuring the pipes and equipment are cleared so nothing bursts when temperatures drop.
- It saves your equipment. Your pump, filter, and heater aren’t built to handle ice. Winterizing gives them a break, either by draining or storing them, or adding protection so they’re not ruined by the cold.
- It stops algae from taking over. Even in cooler weather, algae can grow if the water sits still and unprotected. Winterizing means adding the right chemicals and keeping the water clean and covered so you don’t lift the cover in spring to discover your space overrun by algae.
- It keeps debris out. Leaves, dirt, and other debris can blow into your pool if it’s not covered, which can mean a murky, stinky cleanup later. Winterizing includes covering the pool so it stays as clean as possible over the next few months.
- It makes spring so much easier. When you take the time to close your pool the right way, opening it up next season is faster, cheaper, and a lot less stressful. You’ll be swimming sooner, instead of scrubbing and fixing things!
The Optimal Time to Winterize Your Pool
The best time to winterize your pool is when the water temperature stays below 65°F (18°C) and the weather has cooled off for good, usually around late summer or early fall. That’s when algae stop thriving and your pool is ready to be put to rest for the season.
If you close your pool too early while the water is still warm, you’re giving algae a chance to grow under the cover, which means more cleaning and chemicals come spring. Waiting until it’s consistently cool keeps your water more stable and helps avoid that headache.
Also, think about your local climate. If you’re in a warmer area, you might stretch your pool season a bit longer, but you’ll need to stay on top of regular upkeep until it’s finally time to close it. On the flip side, if you live somewhere with freezing winters, winterizing before that first hard freeze is key since ice can damage your plumbing and equipment if you’re not prepared.
It’s also smart to give yourself about a week to do everything right by cleaning the pool, balancing the chemicals, and getting all the gear prepped and protected. A little planning now saves a lot of trouble later.
Essential Tools for Pool Winterization
Staying prepared for cold weather starts with the right gear. Here are the essential tools for winterizing your pool to help protect your home and keep things running smoothly all season long. Here’s what you’ll need:
- Chemicals: To keep your pool protected all winter, you’ll need certain chemicals to keep your pool in shape. Pool shock, algaecide, a chemical floater, and sometimes pool antifreeze is designed to treat the water before covering your pool, helping prevent algae growth, bacteria buildup, and staining over the winter months.
- Wet/Dry Vac (Shop Vac): A shop vac blows out water from the pool’s plumbing lines or helps remove excess debris and water from hard-to-reach areas. It is especially helpful when clearing out skimmer and return lines before sealing them with winter plugs.
- Submersible Pump: This pump helps lower the water level in your pool to the correct winterization height and is also handy for removing excess water that may accumulate on your pool cover throughout the season. Be sure to choose a model rated for continuous outdoor use and submersion.
- Air Pillows or Exercise Balls: Placed in the center of the pool under the cover, these act as a buffer to absorb the expansion of ice and help prevent the pool walls from buckling or the liner from stretching. They also assist in channeling rainwater and melted snow toward the edges for easier drainage.
- Plugs for Plumbing Lines: These are essential for sealing off return jets and skimmer lines after you’ve blown out the water. Plugs prevent water from getting back into the plumbing and freezing, which can cause cracking and costly repairs in spring.
How Do You Winterize a Pool?
Winterizing a pool is all about protecting your investment from winter damage and making spring opening easier. At a high level, the process involves balancing and treating your pool water, cleaning the pool thoroughly, and allowing the chemicals to circulate for a full day.
From there, you’ll lower the water level (depending on your pool type), drain the equipment, and blow out the plumbing lines to prevent freezing. Once that’s done, you’ll remove accessories like ladders or handrails, plug in the skimmer and returns, and securely cover the pool to keep debris and water out.
While the exact steps may vary depending on whether your pool is above ground or inground and whether you live in a freezing or mild climate, the goal is the same: keep your water clean, your equipment protected, and your pool ready for a stress-free reopening next season.
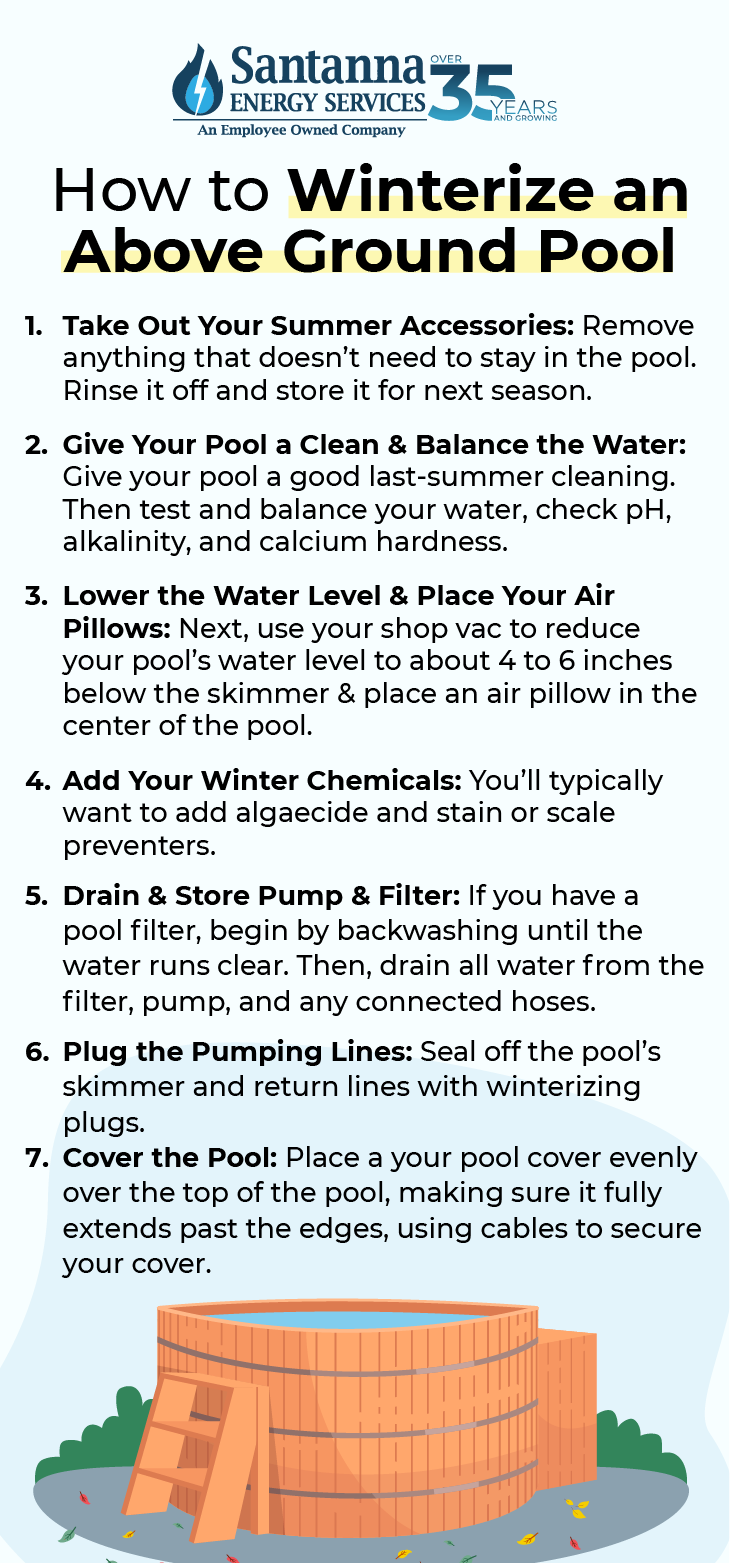
How to Winterize an Above Ground Pool
If you’re still unsure how to winterize your pool, we’ll break it down for you step by step! Here’s how to winterize an above-ground pool:
1. Take out and store accessories
Remove anything that doesn’t need to stay in the pool, such as skimmer baskets, ladders, solar covers, cleaners, and floats. Rinse off each item to remove debris and chemicals, let them dry completely, and store them in a cool, dry place. This process keeps your gear in good condition and ready for use next season.
Leaving these materials in your pool over the winter can cause wear and tear on your equipment and damage to your pool liner.
2. Give your above-ground pool a good clean and balance the water
Give your pool a good last-summer cleaning. Start by scooping out leaves, brushing the walls, and vacuuming the pool floor to get rid of anything that could cause problems over the winter.
Then, test and balance your water, checking pH, calcium hardness, and alkalinity. A good rule of thumb is to aim for a pH balance of 7-7.6, calcium hardness of 200-400 ppm, and alkalinity of 80-120 ppm.
Once it’s balanced, add a pool shock treatment to sanitize everything before closing it up. After cleaning, test and adjust your water’s pH, total alkalinity, and calcium hardness. Once balanced, add a pool shock treatment to sanitize the water and ensure it’s clean before covering it up.
While you can skip cleaning your pool before closing it—especially knowing it will likely collect some debris over the winter—we don’t recommend it.
Leaving dirt, leaves, or algae behind can lead to staining, cloudy water, and a tougher opening process in the spring. A clean pool at closing means fewer contaminants sitting in the water for months, which helps your winter chemicals work more effectively and makes reopening your pool much easier.
3. Lower the water level and place your air pillows
Next, use your shop vac to reduce your pool’s water level to about 4 to 6 inches below the skimmer. This prevents freeze damage by giving any ice that forms room to expand without cracking components.
While you’re at it, place an air pillow in the center of the pool. This helps absorb ice expansion and relieves pressure on the pool walls and cover all winter long.
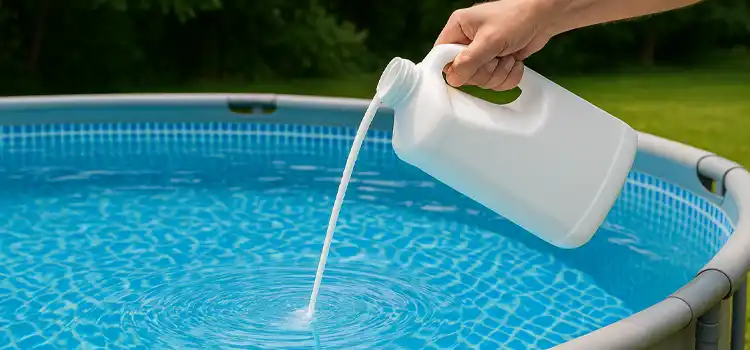
4. Add your winter chemicals
Now it’s time to add your chemicals! You’ll typically want to add algaecide and stain or scale preventers. These chemicals help maintain water clarity and prevent buildup while the pool is not in use.
Follow the dosage instructions on each product’s label, adjusting based on your pool’s gallon size. Depending on the size of your pool, you might need multiple bottles of pool chemicals to evenly protect your pool. For the best results, add the chemicals while your pump and filter are still running so they can circulate evenly throughout the water.
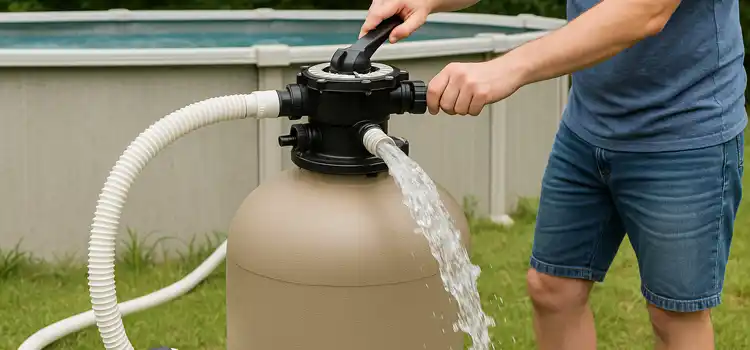
5. Drain and store the pump and filter
After adding chemicals and allowing them to circulate, you’re in the homestretch! It’s time to winterize your pool equipment. If you have a pool filter, begin by backwashing until the water runs clear to flush out trapped debris. Then, drain all water from the filter, pump, and any connected hoses. Water left behind can freeze, expand, and crack components.
Disconnect all hoses, the pump, and the filter, and allow them to dry completely. Once dry, store everything in a dry, protected location such as a basement, shed, or garage—away from freezing temperatures and moisture.
If you have a gas pool heater, turn off the gas valve and disconnect the power to the unit. Drain any water from the heater to prevent internal damage.
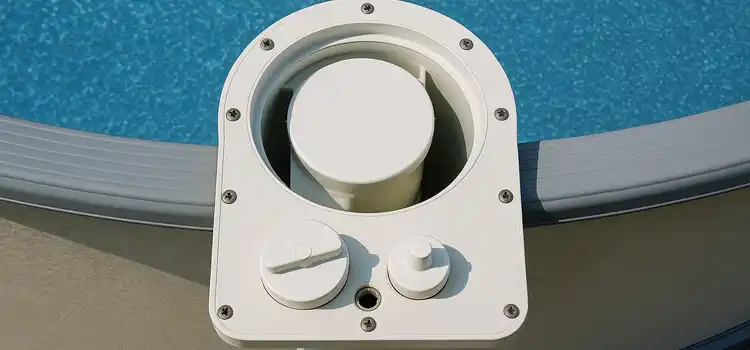
6. Plug the plumbing lines
Next, seal off the pool’s skimmer and return lines with winterizing plugs to keep water from entering and freezing in the plumbing.
For added protection, some pool owners choose to blow out the lines using a shop vac or air compressor before plugging them—this ensures no water is trapped inside. Sealing these lines keeps your plumbing protected from freeze damage and prevents unwanted water from entering your system during winter rains or snow melts.
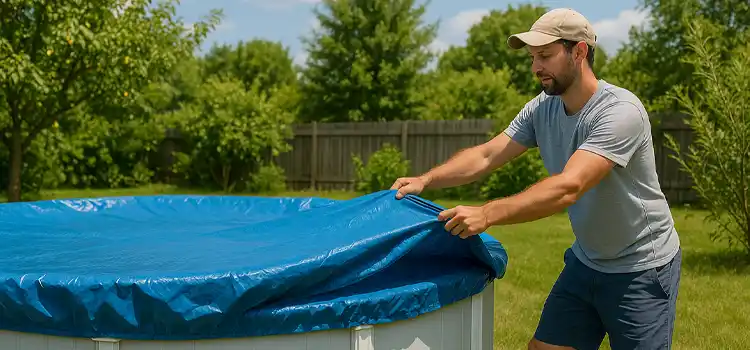
7. Cover the pool
Once everything is cleaned, treated, and stored, it’s time to cover your pool. Start by placing a winter pool cover evenly over the top of the pool, making sure it fully extends past the edges. Use the included winch and cable system to thread the cable through the cover’s grommets and tighten it securely around the perimeter. The cover should sit snugly but not overly tight—just enough to prevent it from sagging or blowing off in strong winds.
If your pool is in an area with high winds or heavy snow, consider using cover clips or water bags around the edge for extra reinforcement. Also, make sure the air pillow remains centered under the cover—this helps support the cover, prevents water from pooling, and reduces pressure from ice expansion.
A properly installed winter cover keeps out leaves, dirt, and precipitation, helping to protect your water quality and the pool structure itself. The exact steps to cover your pool may vary based on your pool cover type and pool structure.
If you follow all these steps, you’ll winterize your above ground pool in a snap!
Winterizing Above Ground Pools for Non-Freezing Conditions
In milder climates, where freezing temperatures are uncommon, you can opt for “active winterization.” This method involves keeping your pool operational with reduced maintenance, rather than completely shutting it down. Here’s how you can keep your pool in shape through the winter season if you live in a warmer climate:
- Maintain Water Chemistry: Even when not in regular use, it’s crucial to keep your pool water balanced to prevent algae growth and equipment corrosion. Regularly test and adjust the pH, alkalinity, and sanitizer levels. Using a winter algaecide can also help keep the water clear.
- Adjust Filtration Schedule: With cooler temperatures and reduced pool usage, you can decrease the filtration time. Running the pump for 2–4 hours during the warmest part of the day is typically sufficient to keep the water circulated and clean. This also helps prevent debris accumulation and discourages algae growth.
- Regular Cleaning: Continue to remove debris from the pool using a skimmer net and vacuum the pool floor as needed. Regular cleaning prevents staining and reduces the workload when the swimming season resumes.
- Cover the Pool: Using a pool cover helps keep out debris, reduces chemical consumption by limiting evaporation, and minimizes sunlight exposure that can encourage algae growth. Choose a cover suitable for your pool type and ensure it is securely fastened to withstand wind and weather.
- Monitor Equipment: Even in non-freezing conditions, it’s important to check your pool equipment regularly. Ensure that pumps, filters, and heaters are functioning correctly, and address any issues promptly to avoid more significant problems.
More About How to Winterize a Pool Pump
Your pump and filter are the backbone of a well-functioning pool and should be a top priority when protecting your pool equipment during winter. Freezing water left inside these systems can cause cracks and major damage, so here’s how to winterize a pool pump for the season:
- Shut everything off: Start by turning off all power to the pool equipment at the circuit breaker, including the pump, filter, heater, chlorinator, and any automation systems. This is a critical safety step that prevents electrical hazards while you work.
- Disconnect the pump: Next, carefully disconnect the pump from the pool’s plumbing. Remove any hoses, PVC fittings, or unions connected to the inlet and outlet of the pump. If fittings are stuck, gently rock them loose rather than forcing them to avoid damage.
- Drain all the water: Once disconnected, you’ll need to drain every bit of water from the pump. Remove the drain plugs from the bottom or side of the pump housing and allow the water to flow out completely. Tilting or even turning the pump upside down for a minute or two ensures that no water is left behind.
- Blow out the lines: For added protection, blow out the return and suction lines to remove any lingering water. A shop vacuum or air compressor can be used to push air through the pipes until all water is cleared. Once dry, seal the ends with rubber winterizing plugs or expansion plugs.
- Winterize your filter: Now, turn your attention to winterizing the filter. If you have a sand filter, backwash it to clean out debris, then move the multiport valve to the “Winterize” or “Closed” position. Drain the tank completely by removing the bottom plug and disconnect any attached hoses. If you have a cartridge filter, open the air relief valve to release pressure, then remove the cartridge, rinse it thoroughly, and allow it to dry completely indoors.
How Do You Winterize an In-Ground Swimming Pool?
It’s best practice to winterize an inground pool too. You’ll mostly follow the same process as winterizing an above ground pool. Here’s a step-by-step guide to help you close your inground pool properly and avoid any springtime surprises:
- Remove and Store Accessories: Start by removing all accessories like ladders, diving boards, pool cleaners, and skimmer baskets. Rinse everything off and store it in a dry place so it’s ready to go next season.
- Thoroughly Clean the Pool and Filter: Give your pool a good scrub. Brush the walls, vacuum the floor, and skim any floating debris. Then backwash the filter or clean it out so it’s not holding onto any leftover gunk over the winter.
- Add Shock and Algaecide: Shocking the pool kills off any lingering bacteria, and algaecide helps prevent algae growth while the pool is closed. Run the pump for a full cycle to let the chemicals circulate.
- Partially Drain the Pool: Lower the water level to about 4–6 inches below the skimmer. This helps protect against freeze damage in the skimmer and return lines.
- Blow Out the Plumbing Lines: Using a shop vac or air compressor, blow out all the water from your pool’s pipes. This step is crucial to keep them from freezing and cracking.
- Add Pool Antifreeze (Optional): In areas with harsh winters, you might want to add pool-safe antifreeze to the lines for extra peace of mind, especially if there’s any risk that water might remain inside.
- Clean and Drain Water From All Equipment: Make sure the pump, filter, and heater are completely drained. Disconnect any hoses and store the equipment in a protected area where it won’t
- Cover the Pool: Lastly, cover your pool with a proper winter cover. Make sure it’s tight and secure to keep out debris, rainwater, and animals and also to block sunlight, which can encourage algae even in cold weather.
Common Winterization Mistakes to Avoid
Winterizing your inground and above ground pool can come with mistakes and potential pitfalls. Small mistakes can lead to big problems once temperatures drop—like cracked pipes, damaged pumps, or cloudy water in spring. To help you avoid costly surprises, here are some of the most common winterization mistakes and how to steer clear of them.
- Closing the Pool Too Early: Initiating the winterization process while the water is still warm can promote algae growth under the cover, leading to a green, murky pool come spring. Experts recommend waiting until water temperatures consistently drop below 65°F (18°C) before closing the pool to minimize algae proliferation.
- Inadequate Cleaning Before Closing: Leaving debris, dirt, or algae in the pool before covering it can lead to stains and clogged filters. Thoroughly clean the pool by skimming, vacuuming, and brushing all surfaces. Also, empty the skimmer and pump baskets to prevent blockages.
- Improper Water Level Management: Not adjusting the water level appropriately can lead to freezing and damage to the skimmer and return lines. Lower the water level to 4–6 inches below the skimmer and avoid draining the pool completely, as this can lead to structural issues.
- Failing to Protect Pool Equipment: Leaving water in the pump, filter, or plumbing lines can cause them to freeze and crack. Drain all equipment and, if necessary, use pool-safe antifreeze in the plumbing lines. Store equipment in a dry, protected area to prevent damage.
- Using an Improper or Poorly Secured Pool Cover: A loose or ill-fitting cover can allow debris to enter the pool and may even blow off during a storm. Ensure the cover fits securely and is anchored properly. Regularly check the cover for damage or sagging and remove any accumulated debris.
When to Call a Professional
While many pool owners can handle winterization on their own, there are times when it’s best to bring in a professional. Here’s how to know when it’s worth making that call:
- You Have a Complex Pool Setup: If your pool includes extras like heaters, waterfalls, integrated spas, or automatic chlorinators, there are more components to winterize and more opportunities for something to go wrong. A professional will know exactly how to shut down each feature safely and thoroughly.
- You’re Not Sure How to Blow Out the Lines: One of the most important (and often most intimidating) steps in winterization is blowing out the plumbing lines. If not done correctly, trapped water can freeze and burst pipes. Pros use powerful air compressors and know the right sequence to follow for your system.
- You’re Short on Time or Tools: Don’t have an air compressor? Unsure where the drain plugs are? Strapped for time? A professional can handle the full process quickly and correctly, giving you peace of mind.
- You’ve Had Issues in the Past: If you’ve dealt with green pool water, cracked equipment, or algae blooms after reopening in spring, those are signs something may have been missed. Hiring a professional can help break that cycle and ensure it’s done right this time.
- You Live in an Area with Harsh Winters: In regions where freezing temperatures are extreme or unpredictable, there’s less room for error. A missed step, like forgetting to drain a pipe or properly secure the cover, can lead to serious damage. A professional knows what to double-check and how to safeguard your setup.
Winterizing your above-ground pool isn’t just a seasonal task, it’s a smart investment in protecting your pool, equipment, and water quality through the off-season. Whether you live in a freezing or milder climate, taking the right steps now means a smoother, cleaner, and less expensive pool opening when warmer weather returns.
From cleaning and balancing water chemistry to covering the pool and protecting your pump, every detail matters. And if you’re unsure or your setup is complex, don’t hesitate to bring in a pro; it’s worth it for the peace of mind.
As you get your pool ready for winter, don’t forget to protect your peace of mind at home too. With Santanna Energy Services’ Unlimited Energy Plan, your electricity supply charge stays the same—no surprises, no spikes, just steady supply charges all winter long. It’s a comfort you can count on, especially when the cold hits. Explore the Unlimited Energy Plan today and see if it’s available in your area.
Tyler is an experienced energy professional, having worked for Santanna Energy Services, for the past four years. He is passionate about renewable energy and believes that diversifying the energy grid is the key to a sustainable future. Tyler is dedicated to supplying consumers with the best possible energy solutions and works diligently to make sure that Santanna can deliver the highest quality service.