How To Install a Thermostat and How Thermostats Affect Your Energy Use

by Tyler Castle
9.2 min read

Key Points of This Article:
- Many homeowners can install a thermostat themselves, but checking compatibility and wiring first helps avoid system issues. Basic installation steps include turning off your power, removing the old thermostat, labeling your wires, mounting the new base, connecting the wires correctly, attaching the thermostat, and restoring power.
- Some smart thermostats require a C-wire, which may limit compatibility with older HVAC systems.
- Smart thermostats can automatically adjust temperatures, but energy savings depend on using the features consistently.
You probably adjust your thermostat every day without thinking much about it, but that small device plays a big role in your home's comfort and energy use. It controls when and how often your heating and cooling system runs, which can affect your energy use over time.
Installing a thermostat yourself may seem like a simple DIY project, but because it connects to your HVAC system and wiring, it is important to understand compatibility and safety before getting started.
As an electricity supplier for Midwest homeowners, we believe understanding how your thermostat affects your energy use can help you make more informed and confident decisions.
In this guide, we'll walk through what to expect if you're thinking about installing a thermostat, when DIY installation may make sense, and how thermostat settings can influence your comfort and energy use.
Can You Install a Thermostat Yourself?
Yes, you can install a thermostat, but it depends on your system, wiring, and compatibility, and safety should always come first.
In many homes, replacing a thermostat can be a manageable project, especially if you are installing a similar model. However, because it involves your HVAC system and wiring, it is important to approach the installation carefully.
Before installing a thermostat, here are a few important things to keep in mind to help your system run safely and efficiently:
- Check compatibility: Make sure the new thermostat works with your HVAC system, whether it is a standard system or a heat pump, to avoid performance or startup issues.
- Secure the wires: Tape the wires after disconnecting them so they do not slip back into the wall.
- Seal the wall opening: Small openings behind the thermostat can affect temperature readings and cause unnecessary system runtime, so sealing the opening helps improve accuracy.
- Choose the right placement: Install the thermostat away from sunlight, vents, and drafts for more accurate readings.
If the wiring seems unclear, your system is more complex, or the thermostat does not work after installation, it is best to contact a professional to help protect your system and ensure everything is working safely.
How To Install a Thermostat
Installing a thermostat usually involves turning off power, replacing the unit, and reconnecting labeled wires, though the exact steps can vary by system. The goal is to make sure everything is connected safely, so your heating and cooling system runs properly.
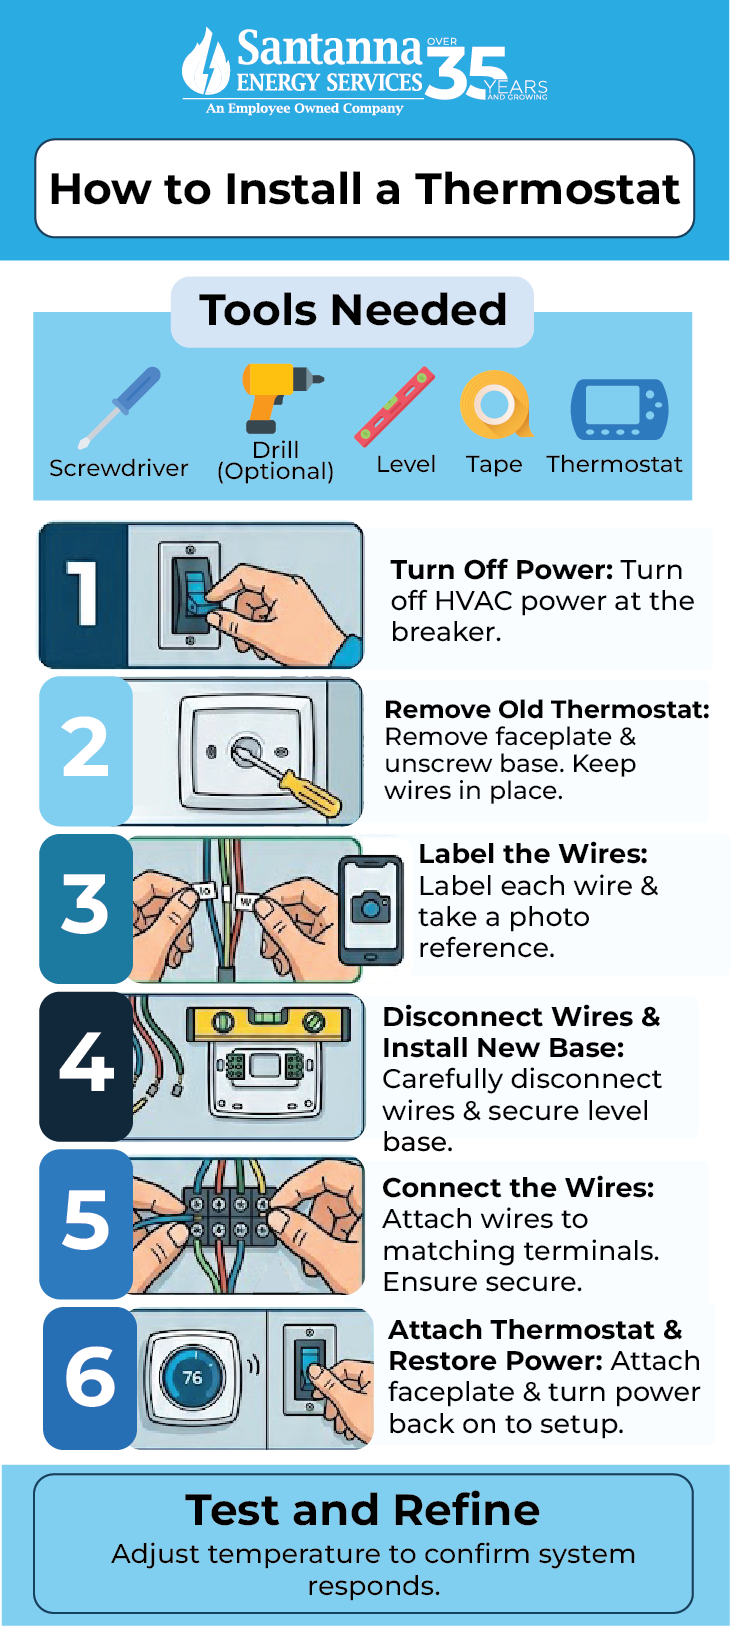
Before getting started, it helps to have a few basic tools ready.
- Screwdriver
- Drill (optional)
- Level
- Wire labels or tape
- New thermostat
These are common household tools, and many homeowners already have most of them on hand, which can help make the installation process more manageable.
Step 1: Turn Off Power
Turn off the power to your HVAC system at the breaker before doing anything else. This helps prevent electrical issues while you are working with the wires.
Step 2: Remove the Old Thermostat
Remove the faceplate and unscrew the base from the wall. Keep the wires in place at this stage so you can clearly see how everything is connected.
Step 3: Label the Wires
Label each wire before disconnecting it and take a photo for reference. This helps ensure you reconnect everything correctly later.
Step 4: Disconnect Wires and Install the New Base
Carefully disconnect the wires and mount the new thermostat base to the wall. Make sure it is secure and level before moving forward.
Step 5: Connect the Wires
Attach the wires to the matching terminals on the new thermostat. Secure connections are important so your system runs properly.
Some thermostats, especially smart models, need a C-wire to supply constant power from your HVAC system. If your current setup does not include one, it may limit the types of thermostats you can install.
If you are unsure about your wiring or need to upgrade it to support a new thermostat, it is best to contact a professional to help ensure your system is installed safely and works properly.
Step 6: Attach the Thermostat and Restore Power
Attach the thermostat faceplate, turn the power back on, and follow the setup instructions to get your system running.
This process is often straightforward for standard systems, but every home setup is different. If anything feels unclear or your system does not respond after installation, it is best to contact a professional.
From an energy standpoint, proper installation matters because your thermostat controls how your system runs day to day. If it is not set up correctly, it can lead to uneven temperatures or unnecessary energy use over time.
After installation, test the thermostat by adjusting the temperature and confirming your heating or cooling system responds properly. If anything seems off, it is best to stop and contact a professional to check the setup.
When Should You Call a Professional Instead?
You should call a professional if your system is complex, the wiring is unclear, or your thermostat is not working after installation.
Here are a few common situations where it makes sense to contact a professional:
- High-voltage systems: These systems are different from standard setups and can be unsafe to handle without the right experience.
- Unlabeled or confusing wires: If you cannot clearly identify where each wire connects, it increases the risk of incorrect installation.
- Multi-stage or zoned systems: These setups are more advanced and may require specific connections to work properly.
- System not responding after installation: If your heating or cooling system does not turn on or respond as expected, it is best to have it checked.
If your installation requires wiring upgrades or a low-voltage conversion, it is best to contact a professional to ensure the thermostat is installed safely and working properly from the start.
How Do Thermostat Settings Affect Your Energy Use and Electricity Bill?
Your thermostat settings affect your energy use by controlling how long and how often your heating and cooling system runs.
The bigger the difference between your indoor setting and the outdoor temperature, the harder your system has to work. In summer, lowering the temperature too much can make your air conditioner run longer, while raising the heat too high in winter can increase heating runtime.
Your daily routine also matters. If your thermostat stays at the same setting while nobody is home or overnight, your system may keep running when less heating or cooling is actually needed. Adjusting settings during these times can help reduce unnecessary energy use without sacrificing comfort.
It is also important to avoid setting extreme temperatures to heat or cool your home faster. Your system works at a steady pace, so lowering or raising the temperature too much will not speed things up. It will only make your system run longer, which can increase energy use.
For example, if your air conditioner uses about 30 kWh per day during hot weather, that could cost about $5.30 per day at the average U.S. electricity rate of 17.65 cents per kWh as of February 2026. If lowering your thermostat by a few degrees increases energy use by about 10%, that could add around 3 extra kWh per day, or roughly $0.53 more each day. Over a month, that could increase your electricity costs by about $15, depending on how often your system runs.
Even small temperature changes can make a difference over time. When your thermostat settings match how your home is actually used, your system can run more efficiently and avoid unnecessary energy use.
Which Type of Thermostat Is Right for Your Home and Energy Use?
Before installing a thermostat, it helps to understand the different options available since they can affect how your heating and cooling system runs and how efficiently your home uses energy. Some offer simple manual control, while others include scheduling or smart features that can help manage comfort and energy use more automatically.
Below are the main types of thermostats you can choose from, along with what to consider for each.
Manual (Non-Programmable) Thermostats
Manual thermostats offer basic temperature control and are usually the simplest to install. You adjust the temperature yourself as needed, which can work well if someone is often home throughout the day. However, because there is no automatic scheduling, your system may keep running when it is not really needed.
Programmable Thermostats
Programmable thermostats let you set schedules so your system adjusts automatically throughout the day. They offer more control and can help reduce unnecessary heating and cooling based on your routine. However, if schedules are not used consistently, you may not see the full energy-saving benefits.
Smart (Wi-Fi) Thermostats
Smart thermostats connect to Wi-Fi so you can control temperatures from your phone and automate adjustments throughout the day. They can also learn your routine to help reduce unnecessary heating and cooling.
They work well for homeowners who want more convenience and flexibility, but proper setup and system compatibility still matter for the best energy-saving results.
There is no one-size-fits-all option because the best thermostat depends on your routine, home setup, and comfort level with installation.
FAQs
What is a C-wire, and do you need one?
A C-wire (common wire) provides continuous power to a thermostat and is often required for smart thermostats to support features like Wi-Fi connectivity.
How long does it take to install a thermostat?
Most thermostat installations take about 1 hour for standard systems, depending on compatibility and setup.
How often should you replace or upgrade your thermostat?
Thermostats are typically replaced every 10 years or sooner if they are outdated or not controlling temperatures accurately.
Where is the best place to install a thermostat?
A thermostat works best when it’s placed on an interior wall, away from sunlight, drafts, doorways, and nearby vents, helping it measure room temperature more accurately.
Installing a thermostat is just one part of the decision, but how you use it every day is what truly shapes your home’s comfort and energy use. Small, consistent adjustments can help your system run more efficiently without extra effort.
For Midwest homeowners dealing with changing seasons, those settings can make a real difference in how often your system runs and what you end up paying for electricity over time.
And while your thermostat helps control how much energy you use, Santanna’s Unlimited Energy plan brings predictability to your supply cost, with no surprises on the supply portion of your bill, no matter your usage.* Explore this plan today to keep your costs predictable while your home stays comfortable.
* Restrictions apply. Enrollment based upon program eligibility. Customers using more than 125% of normal monthly usage as determined by Santanna may be required to switch plans.
Tyler is an experienced energy professional, having worked for Santanna Energy Services, for the past four years. He is passionate about renewable energy and believes that diversifying the energy grid is the key to a sustainable future. Tyler is dedicated to supplying consumers with the best possible energy solutions and works diligently to make sure that Santanna can deliver the highest quality service.